第一個 manifests 設定
Puppet 是用 manifests 來管理每一個 node 要做的事情,透過 Catalog 來存放 dependency information 進行 deploy
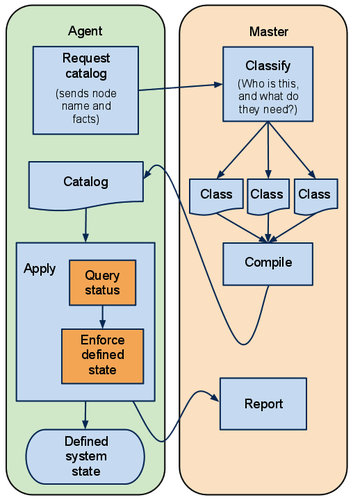
Master 和 Agent 之間取得佈署清單流程:
- Agent 傳送 catalog 內容包含 certname (節點名稱) 和 facts (由 facter 所獲取的系統參數)
- Master 從 catalog 提供的資訊將 manifests 編譯重新打包 catalog。
- Agent 收到 catalog 後執行佈署工作,並且回應 Report 給 Master 執行結果。
Master 和 Agent 提交的關係有:
- 由 Agent 設定的 runinterval 觸發更新
- MCollective 的 MQ (Message Queue) 更新
- 採用 random time 的方式觸發更新
- etc
在 Puppet master 上撰寫 manifests,而 manifests 是可以被即時生效,不需要 reload service。
目標
- agent.puppet.com 這台伺服器必須安裝 chrony 校時。
建立 manifests
在建立 manifests 前或許你可以先查看有哪些 resource 能夠使用,在這邊簡單利用 package、service、file 來示範。
Example: install chrony
node 'agent.puppet.com' {
  package { 'chrony':
    name   => 'chrony',
    ensure => present,
  }

  service { 'chrony':
    name   => 'chrony',
    ensure => running,
    enable => true,
  }
}
- 用 node 定義你的 agent certname。
- package 用來安裝套件。
- service 用來決定啟動服務與是否 ONBOOT。
Example: install apache
node 'agent.puppet.com' {
  package { 'apache':
    name   => 'apache2',
    ensure => present,
  }
  file { ['/var/www/html','/var/www/html/agent.puppet.com']:
    ensure  => 'directory',
    owner   => 'www-data',
    group   => 'www-data',
    mode    => '700',
  }
  file { '/var/www/html/agent.puppet.com/index.html':
    content => "This puppet testing from $::fqdn",
    owner   => 'www-data',
    group   => 'www-data',
    mode    => '0400',
  }
  service { 'apache':
    name   => 'apache2',
    ensure => running,
    enable => true,
  }
}
- 利用 package 和 service 來安裝和啟動 Apache
- file 可以用來管理檔案和目錄
- 用 ensure 宣告 directory 建立目錄結構與權限
- 用 ensure 宣告 file 來管理 index.html 檔案,content 為這個檔案的內容。
- 還用到了 facts 的 fqdn 參數,這樣就能針對不同的 node 來動態給予相對的值。